
(2) RabbitMQ学习 - SpringAMQP
1. RabbitMQ相关概念
RabbitMQ架构图:
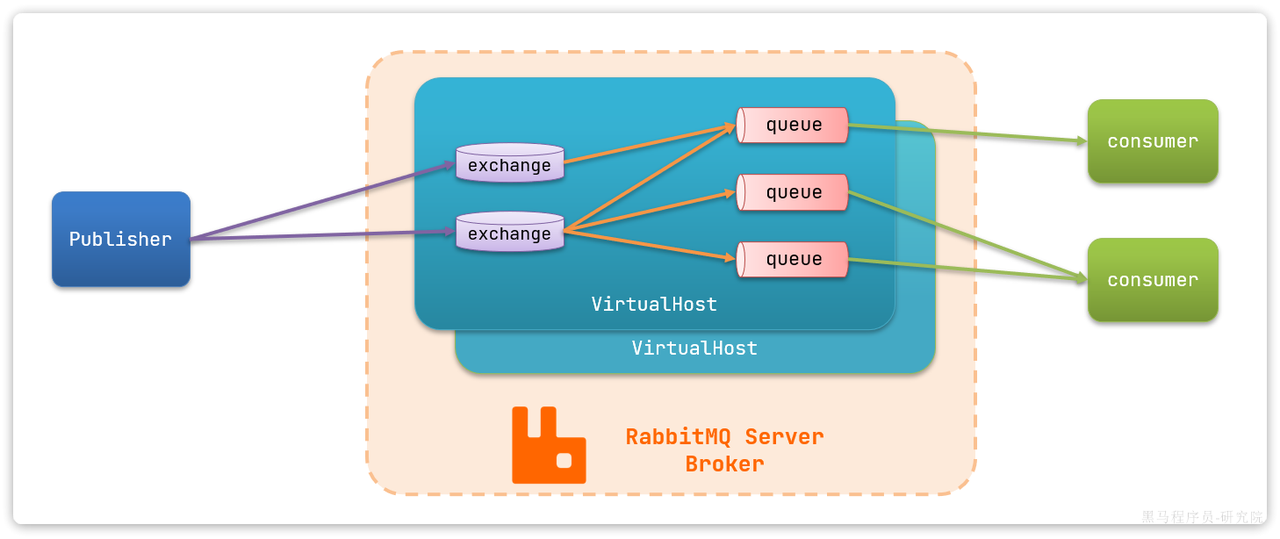
publisher:生产者,也就是发送消息的一方consumer:消费者,也就是消费消息的一方queue:队列,存储消息。生产者投递的消息会暂存在消息队列中,等待消费者处理exchange:交换机,负责消息路由。生产者发送的消息由交换机决定投递到哪个队列。virtual host:虚拟主机,起到数据隔离的作用。每个虚拟主机相互独立,有各自的exchange、queue
2. 快速入门
2.1 pom.xml 依赖
<!--AMQP依赖,包含RabbitMQ-->
<dependency>
    <groupId>org.springframework.boot</groupId>
    <artifactId>spring-boot-starter-amqp</artifactId>
</dependency>
2.2 application.yml 配置
spring:
  rabbitmq:
    host: <your_ip_address>
    port: 5672
    virtual-host: <virtual-host>
    username: <username>
    password: <password>
2.3 消息发送
在编写代码前,请在网页控制台中,创建
simple.queue队列用于演示。
@SpringBootTest
public class SpringAMQPTest {

    @Autowired
    private RabbitTemplate rabbitTemplate;

    @Test
    public void testSendMessage() {
        String queueName = "simple.queue";
        String message = "Hello, Spring AMQP";
        // 发送消息
        rabbitTemplate.convertAndSend(queueName, message);
    }
}
2.4 接收消息
@Component
public class SpringRabbitListener {

    @RabbitListener(queues = "simple.queue")
    public void listenSimpleQueueMsg(String msg) {
        System.out.println("消费者接收到消息:" + msg);
    }

}
控制台输出:

3. WorkQueues模型
- WorkQueues 模型:让多个消费者绑定到一个队列,共同消费队列中的消息
- 目的:多消费者共同处理消息,消息处理速度大大提高
3.1 模拟消息发送
在编写代码前,请在网页控制台中,创建
work.queue队列用于演示。
@Test
public void testWorkQueue() throws InterruptedException {
    String queueName = "work.queue";
    String message = "Hello, Spring AMQP";
    for (int i = 0; i < 50; i++) {
        rabbitTemplate.convertAndSend(queueName, message + ":" + i);
        // 每20ms发送一次消息,相当与每秒发送50条消息
        Thread.sleep(20);
    }
}
3.2 模拟消息接收
@RabbitListener(queues = "work.queue")
public void listenWorkQueueMsg1(String msg) throws InterruptedException {
    log.info("消费者1 ==== 消息 ==== " + msg + " === " + LocalDate.now());
    Thread.sleep(20); // 模拟不同消费者的消费能力
}

@RabbitListener(queues = "work.queue")
public void listenWorkQueueMsg2(String msg) throws InterruptedException {
    log.info("消费者2 ==== 消息 ==== " + msg + " === " + LocalDate.now());
    Thread.sleep(200); // 模拟不同消费者的消费能力
}
3.3 结果分析
结果:消息是平均分配给每个消费者,并没有考虑到消费者的处理能力。导致1个消费者空闲,另一个消费者忙的不可开交
在实际开发中,自然是希望充分利用每一个消费者的能力,因此可以做一下配置:
spring:
  rabbitmq:
    listener:
      simple:
        prefetch: 1 # 每次只能获取一条消息,处理完成才能获取下一个消息
4. 交换机类型
- Fanout:广播,将消息交给所有绑定到交换机的队列。我们最早在控制台使用的正是Fanout交换机
- Direct:订阅,基于RoutingKey(路由key)发送给订阅了消息的队列
- Topic:通配符订阅,与Direct类似,只不过RoutingKey可以使用通配符
- Headers:头匹配,基于MQ的消息头匹配,用的较少。
4.1 Fanout交换机
- 可以有多个队列
- 每个队列都要绑定Exchange
- 生产者发送的消息,只能发送到交换机
- 交换机把消息发送给绑定过的所有队列
- 订阅队列的消费者都能拿到消息
创建下面的交换机和队列用于测试:
hmall.fanout交换机,类型Fanoutfanout.queue1和fanout.queue2, 绑定到交换机hmall.fanout
4.1.1 消息发送
@Test
public void testFanoutExchange() {
    String exchangeName = "hmall.fanout";
    String message = "hello, fanout";
    rabbitTemplate.convertAndSend(exchangeName, "", message);
}
4.1.2 消息接收
@RabbitListener(queues = "fanout.queue1")
public void listenFanoutQueueMsg1(String msg) {
    log.info("广播队列1 === 消息 === " + msg);
}

@RabbitListener(queues = "fanout.queue2")
public void listenFanoutQueueMsg2(String msg) {
    log.info("广播队列2 === 消息 === " + msg);
}
4.1.3 总结
交换机的作用:
- 接收消费者发送的消息
- 将消息按照规则路由发送到与之绑定的队列
- 不能缓存消息,路由失败则消息丢失
- Fanout交换机会将消息路由到每个与之绑定的队列
4.2 Direct交换机
- 队列和交换机绑定,需要指定Routing Key
- 生产者发送消息,也需要指定Routing Key
- 交换机将根据生产者指定的Routing Key进行判断,将消息转发给绑定同样Routing Key的队列
创建下面的交换机和队列用于测试:
- 声明一个名为
hmall.direct的交换机 - 声明队列
direct.queue1,绑定hmall.direct,bindingKey为blud和red - 声明队列
direct.queue2,绑定hmall.direct,bindingKey为yellow和red
4.2.1 消息发送
@Test
public void testDirectExchange() {
    String exchange = "hmall.direct";
    rabbitTemplate.convertAndSend(exchange, "blue", "blue");
    rabbitTemplate.convertAndSend(exchange, "yellow", "yellow");
    rabbitTemplate.convertAndSend(exchange, "red", "red");
}
4.2.2 消息接收
@RabbitListener(queues = "direct.queue1")
public void listenDirectQueueMsg1(String msg) {
    log.info("direct队列1 === 消息 === {}", msg);
}

@RabbitListener(queues = "direct.queue2")
public void listenDirectQueueMsg2(String msg) {
    log.info("direct队列2 === 消息 === {}", msg);
}
4.2.3 总结
描述一下Direct交换机和Fanout交换机的差异
- Fanout交换机将消息路由给每一个与之绑定的队列
- Direct交换机根据Routing Key判断路由给那个队列
- 如果多个队列具有相同的Routing Key,则与Fanout有相似功能
4.3 Topic交换机
Topic交换机与Direct交换机类似,都是根据Routing Key进行路由转发到不同队列。只不过Topic交换机允许队列在绑定Binding Key时使用通配符
Binding Key,一般有多个单词组成,通过 . 分割
通配符规则:
#: 匹配一个或多个单词*: 匹配一个单词
例如:
item.#: 能够匹配item.spu.insert或则item.spuitem.*: 能匹配item.spu,但是无法匹配item.spu.insert
4.3.1 消息发送
@Test
public void testTopicExchange() {
    String exchange = "hmall.topic";
    rabbitTemplate.convertAndSend(exchange, "china.weather", "天朗气清,惠风和畅");
    rabbitTemplate.convertAndSend(exchange, "global.news", "俄军宣布无条件投降");
    rabbitTemplate.convertAndSend(exchange, "china.news", "深度推进民主改革");
}
4.3.2 消息接收
@RabbitListener(queues = "topic.queue1")
public void listenTopicQueueMsg1(String msg) {
    log.info("topic队列1 === 消息 === {}", msg);
}

@RabbitListener(queues = "topic.queue2")
public void listenTopicQueueMsg2(String msg) {
    log.info("topic队列2 === 消息 === {}", msg);
}
4.3.3 总结
描述下Direct交换机与Topic交换机的差异?
- Topic交换机接收的消息RoutingKey必须是多个单词,以
.分割 - Topic交换机与队列绑定时的bindingKey可以指定通配符
#:代表0个或多个词*:代表1个词
5. 声明队列和交换机
在实际开发中,并不会在控制台中去手动创建队列交换机,而是程序启动时检查队列和交换机是否存在,自动创建。
5.1 使用配置类的方式声明队列和交换机
5.1.1 Fanout示例
@Configuration
public class FanoutConfig {

    // 声明交换机
    @Bean
    public FanoutExchange fanoutExchange() {
        return new FanoutExchange("hmall.fanout");
    }

    // 队列1
    @Bean
    public Queue fanoutQueue1() {
        return new Queue("fanout.queue1");
    }

    // 交换机绑定队列1
    @Bean
    public Binding bindingQueue1(Queue fanoutQueue1, FanoutExchange fanoutExchange) {
        return BindingBuilder.bind(fanoutQueue1).to(fanoutExchange);
    }

    // 队列2
    @Bean
    public Queue fanoutQueue2() {
        return new Queue("fanout.queue2");
    }

    // 绑定队列2
    @Bean
    public Binding bindingQueue2(Queue fanoutQueue2, FanoutExchange fanoutExchange) {
        return BindingBuilder.bind(fanoutQueue2).to(fanoutExchange);
    }

}
5.1.2 Direct示例
@Configuration
public class DirectConfig {

    // 声明交换机
    @Bean
    public DirectExchange directExchange() {
        return ExchangeBuilder.directExchange("hmall.direct").build();
    }

    // 队列1
    @Bean
    public Queue directQueue1() {
        return QueueBuilder.durable("direct.queue1").build();
    }

    // 交换机绑定队列1
    @Bean
    public Binding bindingQueue1WithRed(Queue directQueue1, DirectExchange directExchange) {
        return BindingBuilder.bind(directQueue1).to(directExchange).with("red");
    }

    // 交换机绑定队列1
    @Bean Binding bindingQueue1WithBlue(Queue directQueue1, DirectExchange directExchange) {
        return BindingBuilder.bind(directQueue1).to(directExchange).with("blue");
    }

    // 队列2
    @Bean
    public Queue directQueue2() {
        return new Queue("direct.queue2");
    }

    // 交换机绑定队列2
    @Bean
    public Binding bindingQueue2WithRed(Queue directQueue2, DirectExchange directExchange) {
        return BindingBuilder.bind(directQueue2).to(directExchange).with("red");
    }

    // 交换机绑定队列2
    @Bean Binding bindingQueue2WithYellow(Queue directQueue2, DirectExchange directExchange) {
        return BindingBuilder.bind(directQueue2).to(directExchange).with("yellow");
    }
}
5.2 使用注解的方式声明队列和交换机
// 注解方式
@RabbitListener(bindings = @QueueBinding(
        value = @Queue(name = "direct.queue1"),
        exchange = @Exchange(name = "hmall.direct", type = ExchangeTypes.DIRECT),
        key = {"red", "blue"}
))
public void listenerDirectQueue1(String msg) {
    log.info("direct队列1消息:{}", msg);
}

@RabbitListener(bindings = @QueueBinding(
        value = @Queue(name = "direct.queue2"),
        exchange = @Exchange(name = "hmall.direct", type = ExchangeTypes.DIRECT),
        key = {"red", "yellow"}
))
public void listenerDirectQueue2(String msg) {
    log.info("direct队列2消息:{}", msg);
}
6. 消息转换器
默认消息转换器使用的是JDK序列化的方式,消息体积大、可读性差,因此需要使用JSON的方式来做序列化和反序列化。
引入下面的依赖,由于生产者和消费者分别需要序列化和反序列化,因此都需要引入
<dependency>
    <groupId>com.fasterxml.jackson.dataformat</groupId>
    <artifactId>jackson-dataformat-xml</artifactId>
    <version>2.9.10</version>
</dependency>
在生产者和消费者各自的启动类或自定义配置类中国添加下面的bean
@Bean
public MessageConverter messageConverter() {
    Jackson2JsonMessageConverter messageConverter = new Jackson2JsonMessageConverter();
    return messageConverter;
}
消息发送:
@Test
public void testSendMap() {
    HashMap<String, Object> map = new HashMap<>();
    map.put("name", "张三");
    map.put("age", 18);
    rabbitTemplate.convertAndSend("hmall.fanout", "object.queue", map);
}
消息接收:
@RabbitListener(bindings = @QueueBinding(
        value = @Queue(name = "object.queue"),
        exchange = @Exchange(name = "hmall.fanout", type = ExchangeTypes.fanout),
))
public void listenObjectQueueMsg(Map<String, Object> msg) {
    log.info("消息: {}", msg);
}
本文是原创文章,转载请注明来自 Lazyking.site
评论
匿名评论
隐私政策
你无需删除空行,直接评论以获取最佳展示效果